Classrooms
How do I turn the projector on and off?
The picture below shows the projector remote. To turn on the projector, point the remote towards the projector and press the power button that is circled in the picture below. The projector should make a *beep* noise to let you know it's turing on.
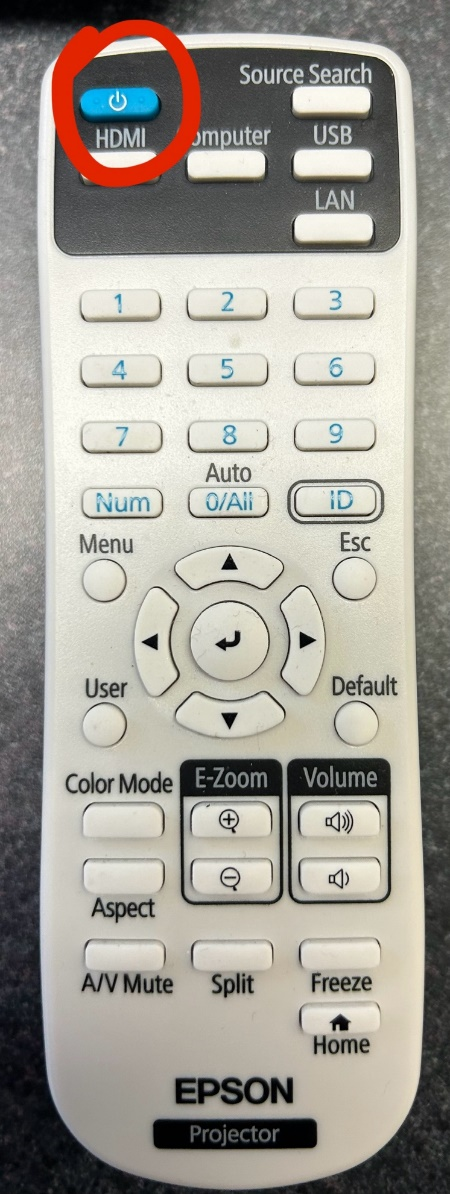
When you are finished with the projector, point the remote towards the projector and hit the power button twice.
* Please Note: Some rooms have different remote styles, but the button is still the same symbol for the power. The projector may take a few seconds to fully boot up. *
Back to Questions
No audio on the projector
- Check the volume on the desktop, normally found in the bottom right corner of the screen
- Check the volume on the Projector via the projector remote
Back to Questions
What is the switcher?
The switcher is shown in the picture below. The switcher is used for switching between showing the laptop screen or the desktop screen. To switch between projecting one of the two screens, just click the center black button in the middle once.
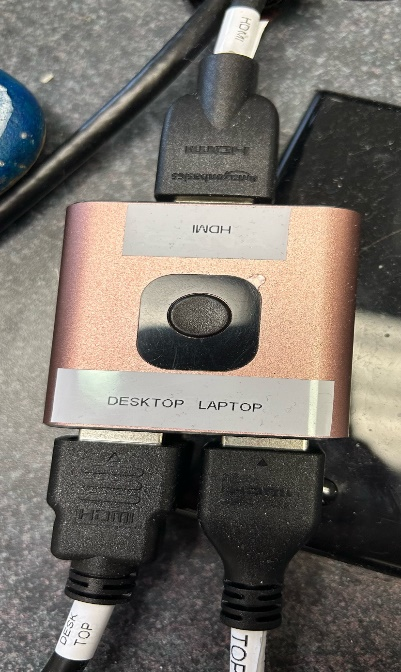
If your computer or laptop is on, by looking at the projector screen you can look to see if your screen is being projected. If it's not being projected, the switcher is more likely on the wrong setting.
The plug-in cords on the switcher are HDMI cables, they are labeled for your convenience. There is one cable that is not plugged into anything, and it should be labeled laptop. That cable is used to plug into a laptop for projecting it on the screen.
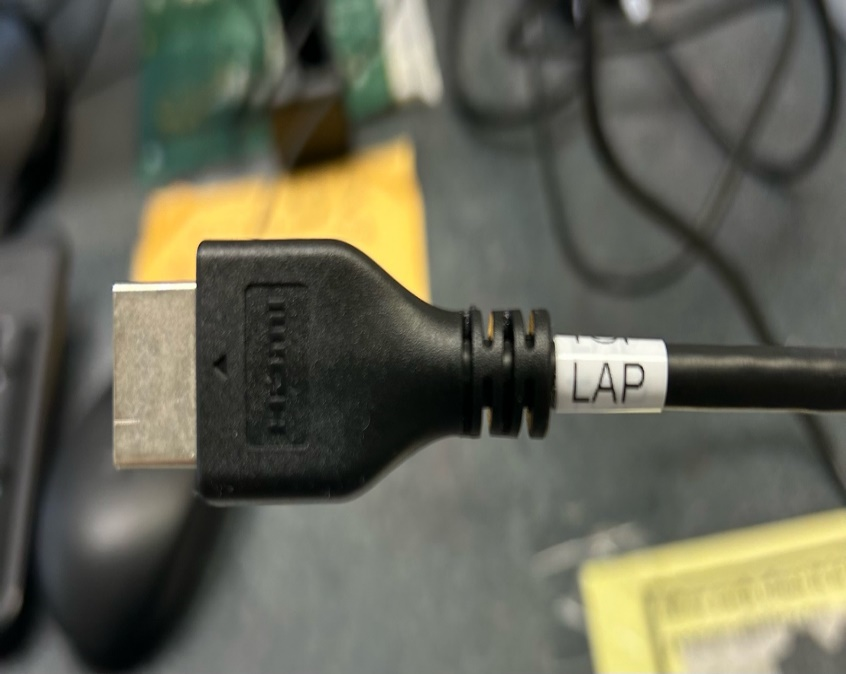
* Please Note: All the switchers work by having the correct HDMI cable plugged into the right places. Please do not remove the HDMI cables from the switcher or plug it in to different areas, as it can lead to issues such as not projecting anything at all. *
Back to Questions
How do I project from my device to the projector
Desktop Projection - If you want to project what is on the desktop to the projector, you first need to ensure the switcher is set to display the desktop, and make sure the computer is on. See "What is the switcher?" for more details.
Laptop Projection - Plug the HDMI cable labeled Laptop, into your computer. Ensure that the switcher is clicked to project the laptop screen. Once those steps are complete, your laptop should be ready for projecting. See "What is the switcher?" for more details.
* Please Note: If the devices are still not projecting, then it is possible that the projection settings are not correct. If this happens, try Windows Key and P together, as shown in the image below. Then select duplicate to mirror your screen or extend to have it act as two separate screens. *

Back to Questions
What if the classroom computer is off?
There are two factors that play into why the computer is not showing anything on the screen or looks to be off. The computer screen could be off, or the computer tower is off. Sometimes it could even be both cases. To quickly fix the issue, check the following places.
- The Computer Screen
- The computer screen should ALWAYS be on and never be turned off. To check that it is on, check for a light on the screen itself.
- The blue circle in the above image is the power indication light. The different light colors could mean:
- Orange/Red Light - Sleeping (Shake the mouse to wake)
- Green Light - On
- No Light - Off
- If the screen is off, press the power button shown inside the red circle in the image above.
- The Computer Tower
- If the screen is on, next check to see if the computer tower is on. The tower should ALWAYS stay on and never be turned off. To check that it is on, check the power button on the tower.
- The red circle in the above image is the power button. There is typically a light within the button. Different lights could mean:
- White Light - On
- No Light - Off
- If the computer tower is off, just press the power button once to turn it on. You should see the power light in the button turn on, and the computer screen will also light up if it is on.
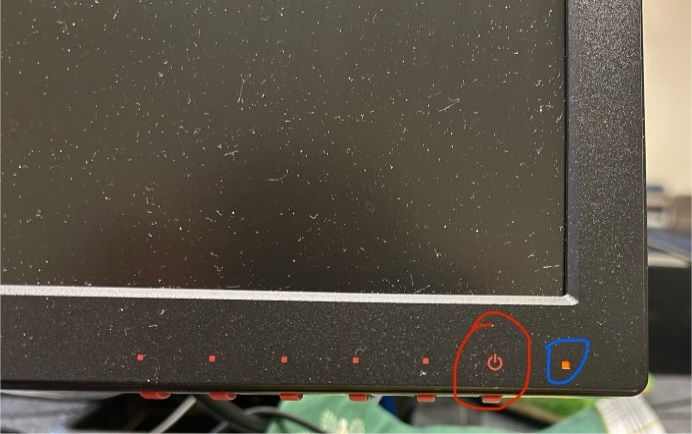
* Please Note: Some computer screens have different mechanics/styles, but the same symbol and rules still apply. *
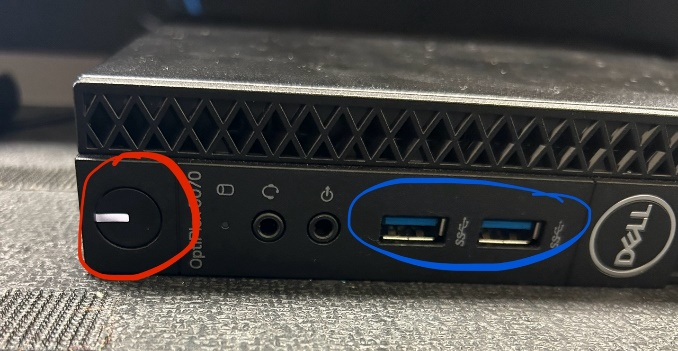
* Please Note: The blue circle in the image of the computer tower is the location of USB ports. The layout of the power button and USB ports may be different for different computers, but the same rule apply when checking if a device is on. *
Back to Questions
What if I have a USB device?
If you are using a laptop, all you have to do is plug the USB device into a USB port on your laptop, then it should pop up for use once logged in. Most laptops have USB ports on the side of the device
If you are using a desktop computer, plug the USB device into a USB port on the computers tower. The device will pop up for use once logged into the computer. Most desktops have USB ports on the front of the tower.

* The blue circle in the image above is an example of what a USB port looks like. *
Back to Questions
What if I have a DVD?
For a DVD, you will have to use the desktop computer, unless you have a digital version for the desktop or laptop. The DVD player is shown below for reference. If the desktop is on, the DVD player should be working as well. To put in a DVD, locate the button circled in red in the reference image. That is the eject button. Click it to open the disk tray, then gently push the tray back in to close it.
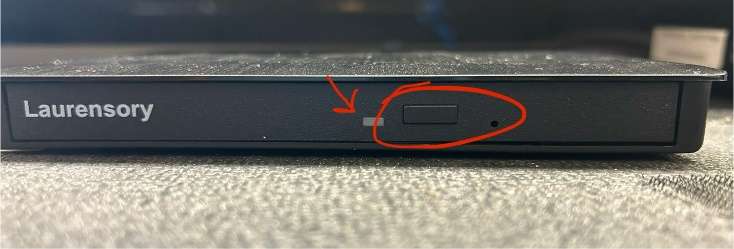
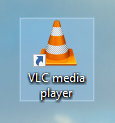
Once you have put the DVD in, and if you are logged into the desktop, the movie should automatically pop up to be played. If it does not, find the VLC Media Player and play it from there. There may be a shortcut on the desktop, or you can search for it via the search feature. The application will look like the image below.
Back to Questions
No audio through the classroom speakers
- Check volume on desktop, typically found in the bottom right corner of the screen
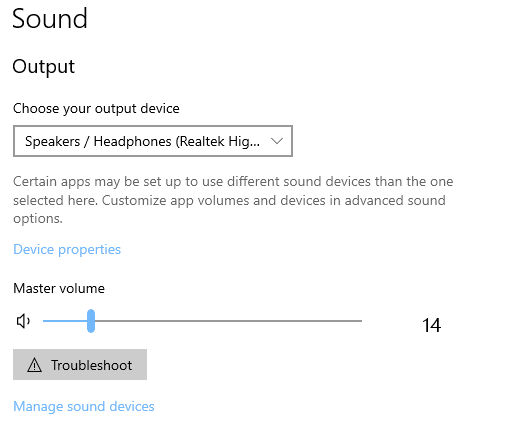
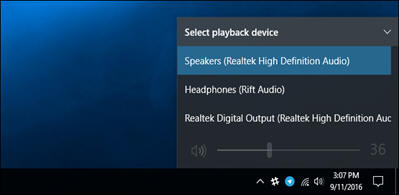
- Check to make sure speakers are recognized in Sound Settings
- Click the Windows start button, typically found in the bottom left corner of the screen
- Type in "Sound Settings"
- Check that speakers are selected as the output
- You can test by changing the output volume to see if you hear the ding
- Check to make sure the speakers are recognized by the volume controls
- Open the volume controls found in the bottom right of the screen
- Check that the speakers are selected
- Check the speakers
- Check for power (any lights on?)
- Is the volume on?


Back to Questions
Thomas 124 - How to Guide
The Mixer

Mixer Tips:
- Make sure the mixer is on. There should be a green light on. If it is off for any reason, just press the power button as labeled in the above image.
- Each microphone and computer device is labeled on the mixer inside the podium as shown in the picture above. This is where ALL volume is controlled.
- Each labeled knob should have a silver line drawn on them to indicated what the AV department suggests as the maximum volume you should use for that device. The white dash on the knob indicates what the current setting is.
* DO NOT TURN OFF THE MIXER. THIS TIP IS ONLY IN CASE THERE ARE ISSUES *
* DO NOT CHANGE THE MAIN VOLUME. ONLY CHANGE THE INDIVIDUALLY LABLED KNOBS *
* LESS IS ALWAYS BETTER TO START OUT. YOU DO NOT WANT TO HURT YOUR HEARING OR THE EQUIPMENT. *
Microphones
Microphone Tips:
- Handheld Microphone
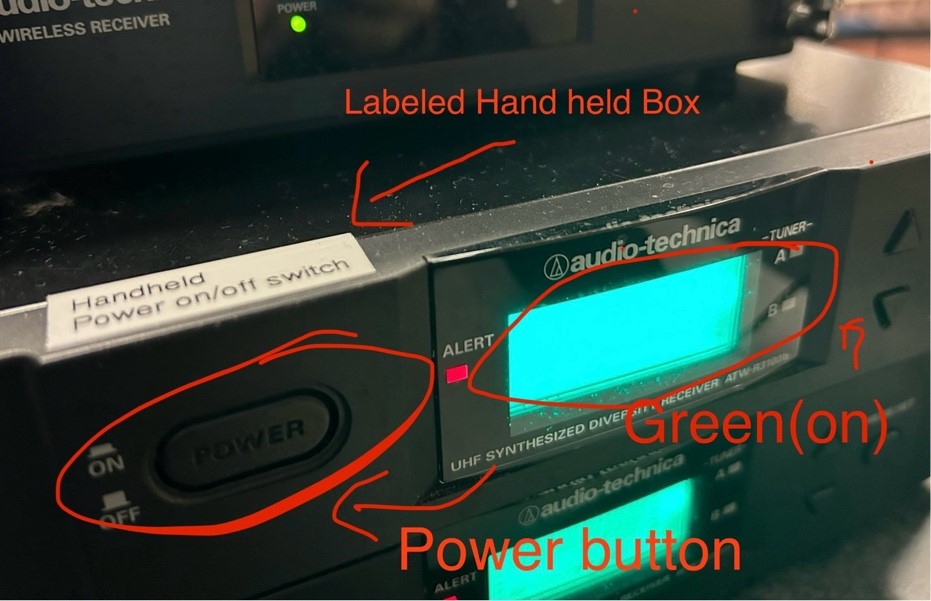
- Make sure to turn on the small black box on top of the podium labeled Handheld. Lights will be on if the device is turned on. If not, just press the power button to turn the device on.
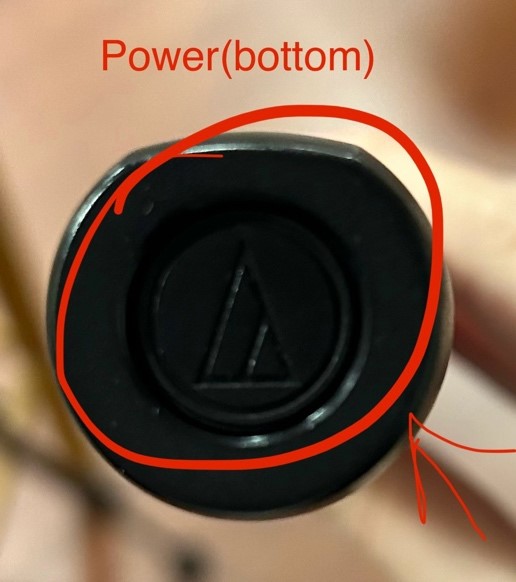
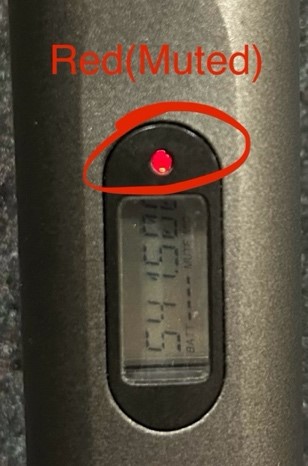
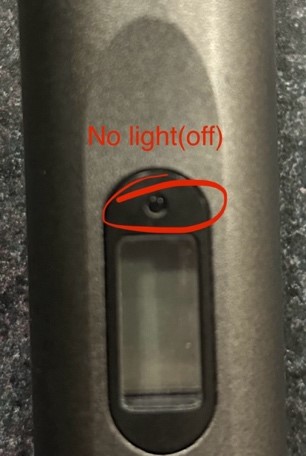
- On the bottom of the microphone, PRESS AND HOLD the power button until the green light turns on like in the image. Press the power button once to mute the mic, and once again to unmute it.
- Adjust the mic volume on the mixer by adjusting the knob labeled Handheld. Check mixer tips for more help using the mixer.
- Again, PRESS AND HOLD the power button on the bottom of the mic to turn it off.
- Lapel Microphone
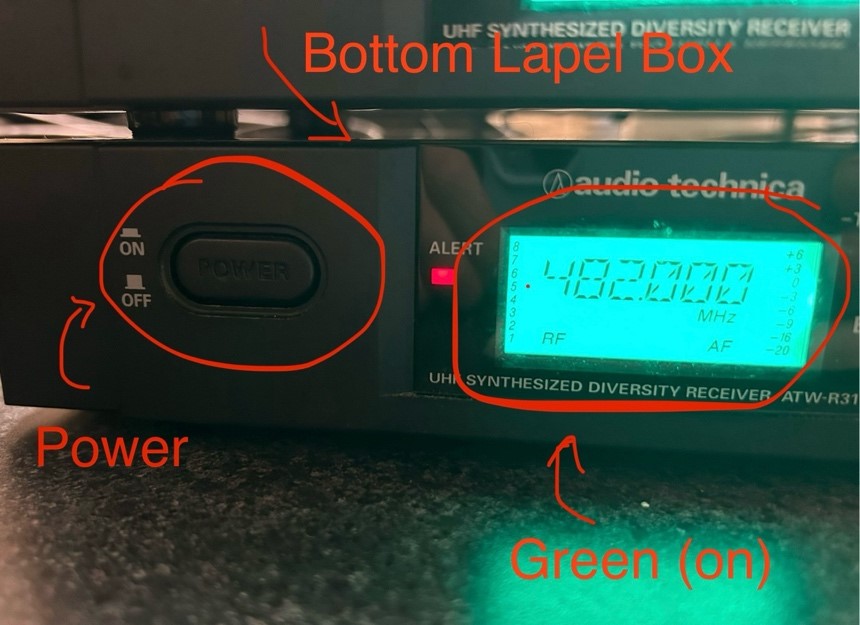
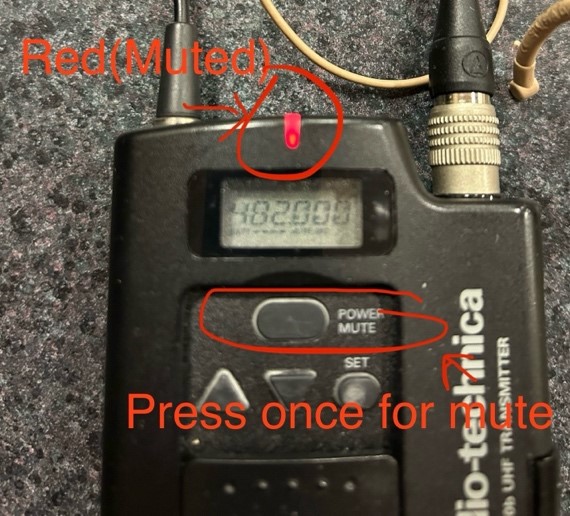
- Make sure to turn on the small black box on top of the podium labeled Lapel. Lights will be on if the device is turned on. If not, just press the power button to turn the device on.
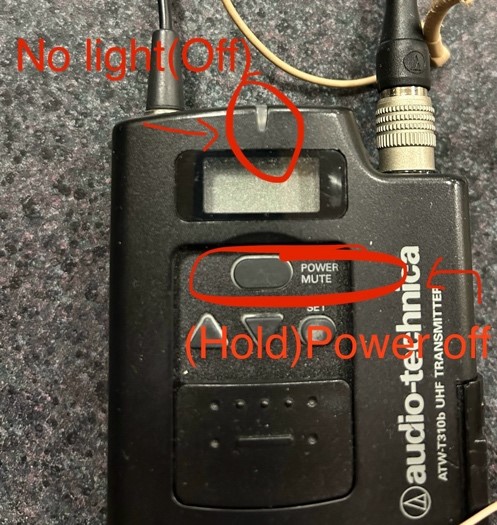
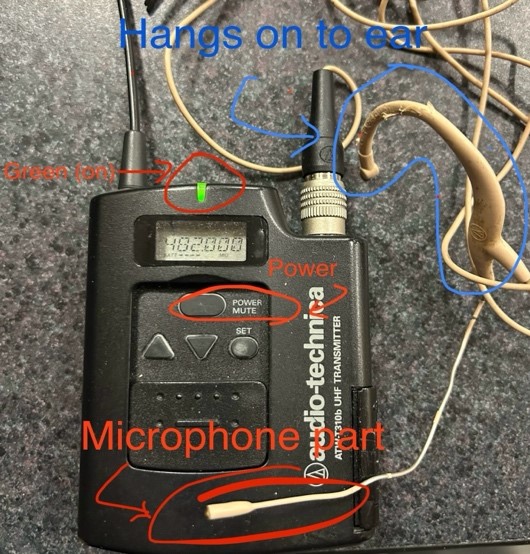
- On the Lapel Microphone, HOLD the button labeled power to turn it on. A green light will appear when it is on. Press the power button once to mute the mic, and once again to unmute it.
- Adjust the mic volume on the mixer by adjusting the knob labeled Lapel. Check mixer tips for more help using the mixer
- Again, PRESS AND HOLD the power button to turn the mic off.
- Podium Microphone
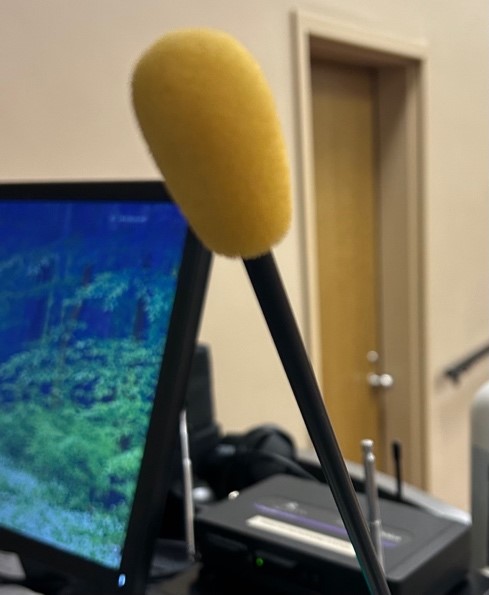
- This mic is always on. To use it, all you need to do is turn up the volume on the mixer knob labled Podium.
- The podium mic is very sensitive. Be careful not to turn the volume up too much. If you do not wish to use it, then simply turn the volume all the way down on the mixer. See the mixer tips for more help on using the mixer.
- If these steps don't work, then the mic may need batteries. All of the microphones take AA batteries.

When you are done, please ONLY turn off the microphones and project and log out of the computer if you used it.
Back to Questions
How do I contact IT about classrooms?
Each room has a unique QR code to send in a help ticket. Below is an example of what the QR codes look like. Most of the QR coes are on the computer screen base. Scan the QR code with your phone camera and follow the link that pops up. Fill out the form as needed, and someone from IT will be over as soon as possible.

* Do not scan this image for help, as each code is unique for each classroom *
If there is no QR code, or if you need assistance elsewhere, please text a ticket to 740-530-4376 or email mcithelp@marietta.edu. Tickets are answered as soon as possible.
Back to Questions
