Excel
Using worksheets and workbooks.
Creating a basic workbook
- Open Excel
- Select Blank Workbook or press Ctrl + N
Creating a workbook from a template
- Select File > New.
- Double-Click a template you would like to use.
- Click and start typing.
Insert a worksheet
- Select the New Sheet plus icon at the bottom of the workbook.
- Or, select Home > Insert > Insert Sheet.
Rename a worksheet
- Double-Click the sheet name on the Sheet tab to quickly rename it.
- Or, right-click on the Sheet tab, click Rename, and type a new name.
Move a worksheet
- To move the tab to the end, right-click the Sheet tab then Move or Copy > (move to end) > OK.
- Or, click and drag the tab to any spot.
Delete a worksheet
- Right-Click the Sheet tab and select Delete.
- Or, select the sheet, and then select Home > Delect > Delete Sheet.
Move worksheets or worksheet data
- Move a worksheet within a workbook
- Select the worksheet tab and drag it to where you want it.
- Caution: When moving a sheet to another workbook, check any formulas or charts that refer to data on the sheet, as moving the sheet might cause errors or produce unintended results in the data.
- Copy a worksheet in the same workbook
- Press Ctrl and drag the worksheet tab to the tab location you want
- Right-Click the worksheet tab and select Move or Copy.
- Select the Creat a copy checkbox.
- Under Before sheet, select when you want to place a copy.
- Select OK.
OR
Back to Questions
How to enter data.
Manual data entry
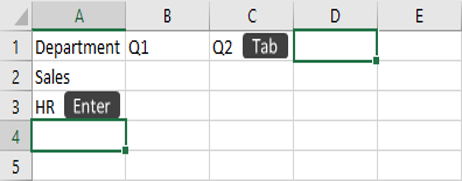
- Select an empty cell, such as A1, and then type text or a number.
- Press Enter to move horizontally and press Tab to move vertically

Filling data in a series
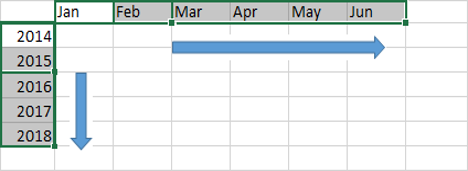
- Enter the beginning of the series in two cell: such as Jan and Feb or 2014 and 2015
- Select the two cells containing the series, and then drag the fill handle across or down the cells.

Automatically filling a column with flash fill
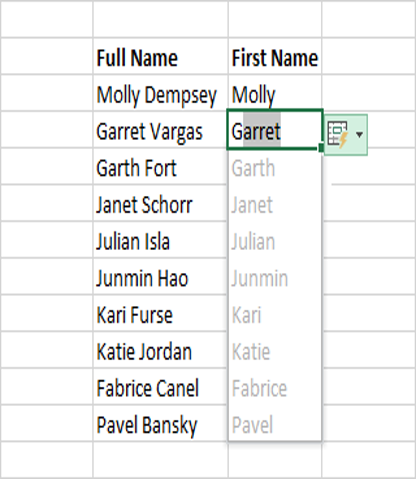
- In the cell under First Name, type Molly and press Enter.
- In the next cell, type the first few letter of Garret.
- When the list of suggested values appears, press Enter.
For example, automatically fill a First Name column from a Full Name column.

Quickly calculate with AutoSum
- Select the cell below the numbers you want to add.
- Select Home > AutoSum
- Press Enter
Tip: For more calculations, select the down arrow next to AutoSum, and select a calculation. You can also select a ranger of numbers to see common calculations in the status bar.
Create a chart
- Select the data you want to show in a chart.
- Select the Quick Analysis button to the bottom-right of the selected cells.
- Select Charts, hover over the options, and pick the chart you want.
Use the Quick Analysis tool to pick the right chart for your data.
Use conditional formatting
- Select the data to conditionally format
- Select the Quick Analysis button to the bottom-right of the selected cells.
- Select Formatting, hover over the options, then pick the one you want.
Use Quick Analysis to highlight important data or show data trends.
Freeze the top row of headings
- Press Enter or Esc to make sure you are done editing a cell.
- Select View > Freeze Panes > Freeze Top Row.
Use Excel as a calculator
- You can enter simple formulas to add, divide, multiply, and subtract two or more numeric values.
- All formula entries begin with an equal sign (=). For simple formulas, simply type the equal sign followed by the numeric values that you want to calculate and the math operators that you want to use — the plus sign (+) to add, the minus sign (-) to subtract, the asterisk (*) to multiply, and the forward slash (/) to divide. Then, press ENTER, and Excel instantly calculates and displays the result of the formula.
- The formula that you enter in a cell remains visible in the formula bar, and you can see it whenever that cell is selected.
- For example, when you type =12.99+16.99 in cell C5 and press ENTER, Excel calculates the result and displays 29.98 in that cell.
Back to Questions
Saving to Onedrive.
Save a workbook to OneDrive to access it from different devices, and share or collaborate with other
- Select File > Save As.
- For work or school work, select OneDrive - (Company Name)
- For personal files, select OneDrive - Personal
- Enter a file name and select Save
Back to Questions
How to collaborate in Excel.
- Select Share on the ribbon or select File > Share
- Select who you want to share with from the drop-down, or enter a name or email address.
- Add an optional message, then hit Send.
Note: If your file is not already saved to OneDrive, you will be prompted to upload the file to OneDrive before sharing.
Back to Questions
How to print from Excel.
Print one or several worksheets
- Select the worksheets you want to print.
- Select File > Print, or press Ctrl + P.
- Adjust any setting, then select print.
Print one of several workbooks
- Select File > Open.
- Hold down Ctrl, click the name of each workbook to print, and the select Print.
Note: All workbook files that you want to print must be in the same folder.
Print all or part of a worksheet
- Click the worksheet, and then select the range of data that you want to print.
- Select File, and then click Print.
- Under Settings, select the arrow next to Print Active Sheets and select the appropriate option for your needs.
- Select Print
Print an Excel table
- Select a cell within the table to enable the table.
- Select File > Print.
- Under Settings, select the arrow next to Print Active Sheets and select the appropriate option for your needs.
- Select Print
Print a workbook to a file
- Select File, and then select Print, or press Crtl + P
- Under Printer, select Print to File
- Select Print
- In the Save Print Output As dialog box, enter a file name and then select OK. The file will be saved in your folder.
Back to Questions
